Using git replace to manage client releases
Recently, I’ve needed to make periodic software releases to a client without maintaining the git history between releases. The intermediate git commits are simply too noisy to be of any value to the client, so I would rather squash them together into individual release commits. I can achieve this using git merge --squash. However, by itself, this doesn’t work for subsequent releases, because this type of merge doesn’t track which commits were included. As a result, future merges will attempt to re-merge commits that were already squash merged before.
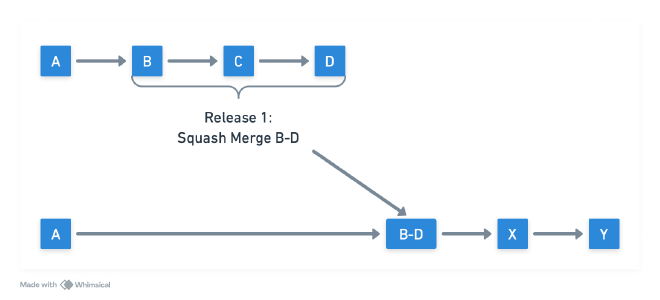
To solve this problem, I’m using git replace --graft. To illustrate how this works, here’s a diagram showing the first release using squash merge:

Notice that commits B through D have been squashed into a single new commit using git merge --squash and added to the release tree. After that, the customer’s git history may include additional future commits (X and Y) that are not part of the original history.
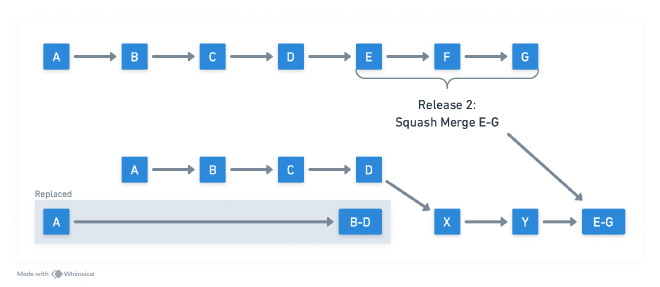
Later, to make the second release, we use git replace --graft to inform git that for the purposes of the merge A -> B-D is equal to A -> B -> C -> D in the original tree.

By doing this, git is able to handle merging the new E through G commits onto the release tree. This works even though there are new commits X and Y that aren’t in the original tree, just like normal branch merging. Importantly, the git replace --graft replacement only applies to the local git repository. As a result, pushing the newly merged E-G to a remote repository (Github, Gitlab) doesn’t result in pushing all the commits A -> B -> C -> D. Instead, git merely pushes the new release commit (E-G) linked to the previous HEAD of the branch (in this example, Y).
Here are the commands used to achieve this release process. First, let’s setup a remote to pull the upstream changes from the internal repository into the local repository.
git remote add upstream <remote url>
Next, let’s make the first release:
git fetch upstream
git log --oneline origin/main..upstream/main
git merge --squash upstream/main
git commit -m "release 1"
git replace --graft HEAD upstream/main
The last command is the most important. It informs git that from now on treat HEAD as if it were the same as upstream/main. This command needs to be run after every release in preparation for future releases. At this point, the changes can be submitted via the normal workflow, either pushed directly to the origin repository or submitted as a pull/merge request.
Now, simply repeat the exact same commands for subsequent releases. Because of the git replace --graft, the next merge will be able to identify the new commits while effectively ignoring the commits included in previous releases. Again, this works even though the customer’s repository may have additional commits that aren’t in the upstream repository. This allows the customer to make their own private changes as needed (e.g., to support their CI/CD environment).
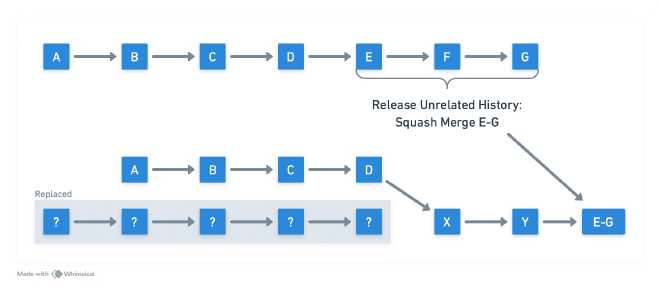
Importantly, this process works even across repositories with completely unrelated histories. Because we can use git replace --graft to replace any commit with any other commit, if we know that two source trees are effectively the same even if their git histories are completely different, we can use it to merge commits into repositories with completely unrelated histories.

Pretty slick!